Soups & Stews
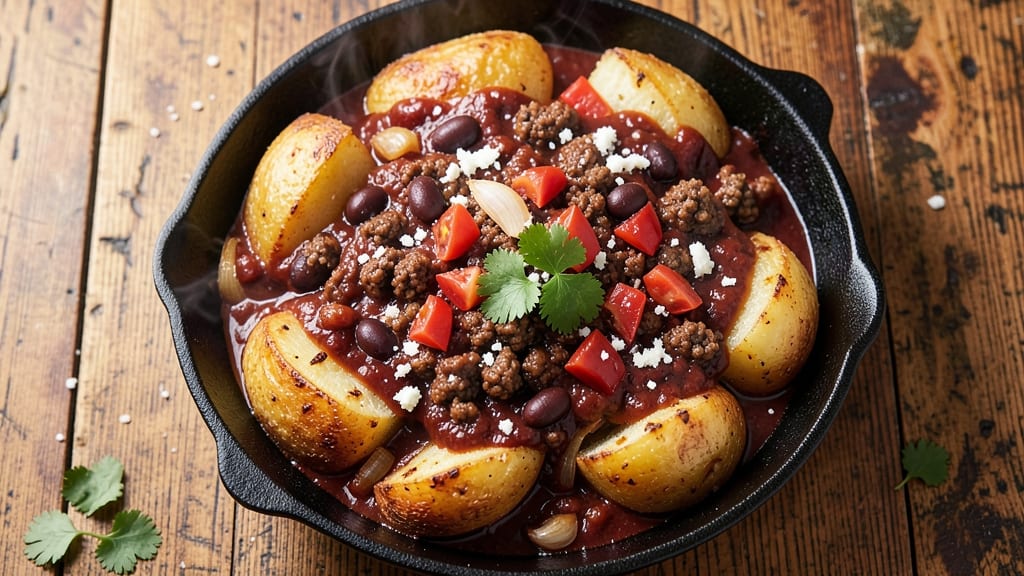
This baked potato bar chili recipe delivers the ultimate comfort food experience—smoky, hearty chili paired with crispy, buttery potatoes loaded to perfection. The secret lies in slow-cooked chili with deep, savory flavors and a potato roasting technique that guarantees crispy skins and fluffy interiors every time. I perfected this dish during a chilly winter weekend when I wanted to recreate that nostalgic diner feel at home.
The chili itself is a robust blend of ground beef, kidney beans, and tomatoes, simmered with a mix of spices that build layers of warmth—just enough heat to satisfy without overwhelming.
Meanwhile, the potatoes roast until golden and tender, ready to be topped with all the fixings: sharp cheddar, crispy bacon, sour cream, and fresh green onions. This isn’t just a meal; it’s an interactive feast that brings everyone to the table.
What makes this recipe special is the balance—rich, smoky chili that pairs perfectly with the buttery, crispy potatoes. The toppings transform a simple baked potato into a customizable masterpiece, letting everyone build their ideal bite.
It’s the kind of dish that feels indulgent yet brings warmth and satisfaction to any gathering, whether it’s a family dinner or a cozy night in.
Serve this chili and potato bar family-style for maximum enjoyment, or set up individual bowls with all the toppings for a build-your-own experience. Pair it with a simple green salad or crusty bread to round out the meal. Here’s how to make it happen—step by step.
Ingredients for baked potato bar chili
Six servings of chili, six crispy potatoes—this is where comfort food meets customizable indulgence.
| Ingredient | Amount | Notes |
|---|---|---|
| Ground Beef (80/20) 🥩 | 2 lb | Lean but flavorful, pre-formed into 1-inch crumbles |
| Kidney Beans 🌿 | 1 ½ cups | Canned, drained and rinsed (or cooked) |
| Tomato Sauce 🍅 | 1 ½ cups | High-quality jarred or homemade |
| Onion 🧅 | 1 whole | Yellow or red, diced (about 1.5 cups) |
| Garlic Cloves 🧄 | 4 cloves | Minced, fresh preferred |
| Chili Powder 🌶️ | 2 tbsp | Smoked or mild variety |
| Ground Cumin 🌿 | 1 tbsp | Toasted for deeper flavor |
| Brown Sugar 🍚 | 2 tbsp | Light or dark, packed |
| Salt 🧂 | 1 ½ tsp | Kosher or sea salt |
| Black Pepper 🌶️ | ½ tsp | Freshly ground preferred |
| Russet Potatoes 🥔 | 6 whole | Large, unpeeled, scrubbed |
| Unsalted Butter 🧈 | ½ cup | Melted, full-fat for best flavor |
| Sharp Cheddar Cheese 🧀 | 2 cups | Shredded, block preferred |
| Crispy Bacon 🥓 | 1 cup | Cooked and crumbled (about 6 slices) |
| Sour Cream 🥛 | ½ cup | Full-fat for creaminess |
| Green Onions 🌱 | ¼ cup | Sliced, fresh preferred |
| Vegetable Oil 🫒 | 2 tbsp | For roasting potatoes |
The ground beef is the foundation, so 80/20 fat ratio is key—it keeps the chili rich without getting greasy. Costco or local butchers often sell pre-formed chunks, saving you time. For the potatoes, Russets are non-negotiable—they hold up to roasting while staying fluffy inside. If you can't find them, Yukon Golds work in a pinch, but they'll be slightly creamier. The kidney beans? Canned is fine, but if you're feeling ambitious, soak and cook your own for better texture. And that tomato sauce? Rao's or Muir Glen are my go-tos for consistency, but any quality jarred sauce will do.
No chili powder? Mix smoked paprika and cayenne at a 3:1 ratio—it's close enough. Short on brown sugar? Maple syrup works in a bind, but it'll change the depth slightly. The bacon can be pre-cooked from the store (just crumble it yourself), or you can cook your own for extra crispiness. Green onions are optional, but they add that fresh pop of color. For the sour cream, full-fat is worth it—it doesn't cut through the richness like the light versions. And if you're serving a crowd, double the toppings. Trust me, they'll disappear.
Potatoes keep best in a cool, dark place for 3-4 days—don't refrigerate them until after roasting. The chili reheats beautifully; in fact, it tastes even better the next day as the flavors meld. Store leftovers in airtight containers for 4-5 days in the fridge or freeze for 3 months. I like to portion the toppings separately so everyone can build their own masterpiece. And if you're prepping ahead, roast the potatoes a day early—they reheat just fine in the oven at 375°F for 15 minutes.
Why You'll Love This Recipe
- Here’s what sold me: you can serve it as chili or turn it into a baked potato bar in minutes. Just top those spuds with the chili, beans, cheese, sour cream, and whatever else you’ve got. It’s the same base, two totally different meals—great for game day, lazy Sundays, or when you’re feeding a crowd.
- One-Pot Magic: I swear by this recipe because it’s all in one pot—no chopping mountains of veggies, no fussing with layers. Just brown the beef with onions and garlic, dump in the beans and sauce, and let it simmer. Honestly, the only knife work is dicing one onion, and the rest? Stir-and-go.
- Rich, Deep Bite: The 80/20 ground beef makes this chili unapologetically flavorful—juicy, fatty, and packed with that meaty satisfaction. Then you add the garlic and let it caramelize just a little? That’s where it gets dangerous. Between us, this isn’t your watery canned chili.
- Potato Bar Ready: Here’s what sold me: you can serve it as chili or turn it into a baked potato bar in minutes. Just top those spuds with the chili, beans, cheese, sour cream, and whatever else you’ve got. It’s the same base, two totally different meals—great for game day, lazy Sundays, or when you’re feeding a crowd.
Step-by-step instructions for baked potato bar chili
Transform simple ingredients into a hearty chili with smoky depth and perfect texture.
Sear the Ground Beef for Maximum Flavor
Heat a large Dutch oven over medium-high heat and add the 2 lb ground beef (80/20). Break it apart with a wooden spoon and cook, stirring occasionally, until it loses its raw color and begins to brown. This should take about 5-7 minutes. The fat should render out, leaving you with rich, flavorful crumbles.
Don't drain the fat—it's essential for building flavor. Once the beef is fully browned, add the 1 whole diced onion and 4 minced garlic cloves. Cook for another 3-4 minutes until the onion softens and becomes translucent. This aromatic base will form the foundation of your chili's deep, savory flavor.
Build the Chili Base with Spices and Beans
Reduce the heat to medium and stir in the 2 tbsp chili powder, 1 tbsp ground cumin, 2 tbsp brown sugar, 1.5 tsp salt, and 0.5 tsp black pepper. Let the spices toast in the rendered fat for 1 minute to deepen their aroma before adding the 1.5 cups tomato sauce and 1.5 cups kidney beans.
Stir everything together and bring the mixture to a gentle simmer. The spices should meld into the beef and onions, creating a rich, fragrant base. Let it cook uncovered for 15 minutes, stirring occasionally, to allow the flavors to develop and the chili to thicken slightly. This step ensures your chili has that signature smoky depth and balanced sweetness.
Roast the Potatoes for Crispy Perfection
While the chili simmers, preheat your oven to 425°F. Scrub the 6 whole russet potatoes thoroughly to remove any dirt, then pierce each one 2-3 times with a fork to prevent them from bursting. Place them on a baking sheet and drizzle with the 2 tbsp vegetable oil, tossing to coat evenly.
Roast the potatoes for 45-50 minutes, flipping them halfway through, until they are tender when pierced with a fork and the skin is golden brown and crispy. The internal temperature should reach 205°F. These perfectly roasted potatoes will be the ideal vessel for your loaded chili topping bar.
Assemble the Loaded Topping Bar
Once the chili has simmered for 30 minutes total (or until it reaches your desired thickness), remove it from heat. In a separate bowl, melt the 0.5 cup unsalted butter and mix it with the 2 cups sharp cheddar cheese until smooth. Stir this mixture into the chili for a creamy, cheesy finish.
Set out the toppings in individual bowls for the ultimate chili bar experience: 1 cup crispy bacon, 0.5 cup sour cream, and 0.25 cup sliced green onions. Serve the chili in a large bowl or individual bowls, allowing everyone to customize their own loaded potato bowl with a generous serving of chili and their choice of toppings. The contrast of creamy, crispy, and smoky flavors makes every bite unforgettable.
Pro Tips For Making Baked Potato Bar Chili
- Brown the Beef First: Skip the "quick sear" urge—break the beef into small chunks and cook it on medium-high until the edges are dark brown, not just pink. That’s where the deep, meaty flavor hides, and rushing this step means your chili will taste more like ground beef than a rich, layered dish. (Yes, it takes 8-10 minutes, but your chili will taste like you slaved over it.)
- Toast the Beans: Drain and rinse the kidney beans, then toss them in a dry skillet over medium heat for 3-4 minutes until they’re slightly charred in spots. This cuts the beany taste and adds a smoky note that makes the chili feel more complex—no extra spices needed. (I learned this the hard way after serving chili that tasted like canned beans had won a battle.)
- Simmer, Don’t Boil: Once everything’s in the pot, keep the heat low enough that you only see tiny bubbles breaking the surface—no rolling boil. High heat turns tomato sauce into mush and makes the onions turn to sludge. Let it bubble gently for at least 45 minutes, stirring occasionally, so the flavors meld instead of fight.
- Add the Onion Early: Dice the onion finely (smaller than you think) and cook it with the beef until it’s soft and translucent—about 5 minutes before adding the garlic. This prevents a raw onion aftertaste in the finished chili and ensures the garlic gets infused into the beef fat, not just floating on top. (Pro move: Use a splash of water if it sticks and burns.)
Troubleshooting perfect results
Chili Too Thin?
If your chili ends up too watery, don’t panic! The fix is simple: simmer uncovered for an extra 10-15 minutes to reduce the liquid.
For a quicker solution, mix 1 tbsp cornstarch with 2 tbsp cold water, stir it into the chili, and let it thicken over medium heat for 2-3 minutes.
I’ve also found that adding ½ cup cooked ground beef (or even diced potatoes) helps absorb excess moisture while adding texture. 🔥
Potatoes Not Crispy?
Crispy skins are everything! If your potatoes turn out soggy, adjust your oven rack to the middle position and ensure they’re spaced 1 inch apart on the baking sheet. For extra crispiness, brush them with melted butter before roasting and flip them once halfway through.
If you’re short on time, broil them for 2-3 minutes at the end for a golden finish. Pro tip: Russets are your best bet—Yukon Golds won’t crisp as well. ❄️
Chili Too Spicy?
Balance the heat by adding 1-2 tbsp sour cream or ½ cup diced tomatoes to dilute the spice. For a sweeter contrast, stir in 1 tbsp brown sugar or 1 tsp honey to mellow the kick.
If you’re serving it with the potato bar, let guests add extra sour cream or cheese to their bowls—it’s a great way to customize heat levels. 🌶️
Toppings Too Dry?
If your bacon or cheese toppings lose moisture, reheat them separately in a 350°F oven for 5 minutes to restore crispiness. For the sour cream, mix in 1 tsp lemon juice to prevent curdling when added to hot chili.
I like to keep toppings in small bowls and reheat them in 1-minute intervals in the microwave if needed. The key is to keep everything warm but not soggy. 🥓
Chili Tastes Bland?
Boost flavor by adding a splash of Worcestershire sauce or a pinch of smoked paprika to deepen the richness. For umami, stir in 1 tbsp soy sauce or ½ cup beef broth>.
If the chili lacks acidity, squeeze in 1 tbsp lemon juice or add ½ cup diced tomatoes. The potato bar’s creamy toppings can also help balance any flatness—just ensure your chili has enough salt and spice to shine. 💡
Nutrition facts
Frequently asked questions
Can I make this chili in a slow cooker?
Brown the ground beef first in a skillet, then transfer everything to your slow cooker. Cook on low for 6-8 hours or high for 3-4 hours until thick and flavorful. The slow cooker method actually enhances the chili's depth, making it even more tender and rich. Just stir in the beans and tomato sauce at the beginning.
What are the best toppings for this potato bar?
Beyond the basics (cheddar, bacon, sour cream), try adding crumbled blue cheese, pickled jalapeños, chopped cilantro, or avocado slices for freshness. For extra crunch, toasted pumpkin seeds or crushed tortilla chips work perfectly. The key is balancing textures—creamy, crispy, and fresh elements make every bite exciting!
How do I keep the potatoes warm for serving?
Roast the potatoes 30-45 minutes ahead and keep them warm in a 200°F oven on a wire rack (not touching the pan). For the chili, maintain it at 160°F in a slow cooker on low. If reheating, warm chili in a pot over low heat—never microwave it directly, as it can make the texture grainy. The potato bar stays perfect for 2 hours this way.
Can I substitute ground turkey or beans for the beef?
Yes! For ground turkey, use 93% lean to maintain moisture and add 1 tbsp olive oil to the pan. For a vegetarian version, swap the beef for 1.5 cups lentils or crumbled tempeh, and increase the tomato sauce to 2 cups. The chili will still be hearty—just adjust seasoning slightly. The potato bar remains the same delicious vessel for any chili variation!
What’s the best way to store leftovers?
Store chili in airtight containers in the fridge for 4-5 days or freeze for 3 months. Reheat gently on the stove with a splash of water or broth. For potatoes, keep them whole in the fridge for 3-4 days—reheat cut sides in the oven at 375°F for 15 minutes to restore crispiness. The toppings (cheese, bacon) freeze well separately for 1 month.