
Side Dishes
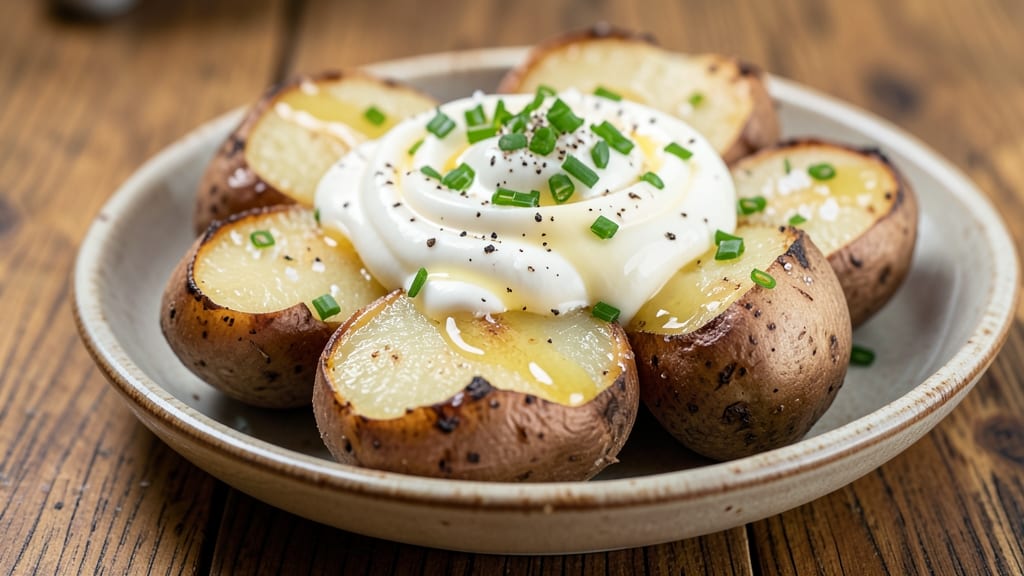
This baked potato and sour cream recipe delivers the perfect balance of crispy golden skin and ultra-creamy interior every time. The secret lies in high-heat baking and a simple sour cream topping that transforms a basic potato into a restaurant-worthy side dish.
I've perfected this technique after countless trials—no more soggy centers or uneven cooking.
What makes this recipe stand out is the foolproof method for achieving crispy skin without drying out the potato.
We'll use a combination of direct heat and proper baking time to get that perfect texture, followed by a light dusting of butter and sour cream that melts into a velvety topping. The result?
A potato so tender it practically falls apart, topped with a creamy, cooling load that's impossible to resist.
By the time you're done, you'll have a side dish that's hearty enough to serve as a main for casual dinners.
The sour cream topping adds a luxurious touch that elevates simple potatoes to something special, while optional garnishes like chives, cheese, or bacon bits let you customize it to your taste. This is comfort food at its finest—warm, satisfying, and ready in under an hour.
The best part? This recipe scales perfectly for any occasion, from family dinners to game day gatherings. Let's get started with a method that guarantees success every time, even for beginners. The key is patience—those crispy skins and creamy toppings are worth the wait.
Ingredients for baked potato and sour cream
Four big potatoes, rich butter, and velvety sour cream—this combo guarantees crispy skins and creamy centers every time.
| Ingredient | Amount | Notes |
|---|---|---|
| Russet Potatoes 🥔 | 4 whole | Large, similar-sized for even cooking |
| Unsalted Butter 🧈 | ½ cup | Melted for brushing, full-fat preferred |
| Sour Cream 🥛 | 1 cup | Full-fat for best creaminess |
| Salt 🧂 | 1 ½ tsp | Kosher or sea salt, divided |
| Black Pepper 🌶️ | ½ tsp | Freshly ground for best flavor |
| Fresh Chives 🌿 | ¼ cup | Chopped, for garnish (optional) |
| Shredded Cheddar Cheese 🧀 | ½ cup | For optional cheesy load |
| Crispy Bacon Bits 🥓 | ¼ cup | For optional protein boost |
| Garlic Powder 🧄 | ½ tsp | For seasoning (optional) |
| Olive Oil 🫒 | 2 tbsp | For extra crispiness |
The potatoes are the star, so pick Russets—they're the starchiest and crisp up best. Idaho-grown ones from Costco or Walmart are my go-to because they're consistently perfect. If you grab the pre-washed kind, scrub them well first—they're still coated with dirt. For that restaurant-quality crisp, I swear by brushing with melted butter and olive oil before baking. The butter adds flavor, while the oil helps create that golden crust. Pro tip: Don't skip the high-heat start—those first 20 minutes at 450°F are what make the difference between good and showstopping.
No sour cream? Greek yogurt works perfectly—just know it'll be slightly tangier. The butter matters here too—full-fat is non-negotiable for that ultra-creamy texture. Short on chives? Green onions or parsley give a similar fresh pop. Want extra flavor? Mix in a dash of garlic powder or smoked paprika with your salt. For the bacon bits, I always use Trader Joe's crispy bacon because it's pre-cooked and stays crunchy. But honestly, any good bacon will do—just make sure it's crispy before sprinkling. And if you're feeling fancy, a sprinkle of freshly cracked black pepper right before serving takes it to the next level.
These keep beautifully—3-4 days in the fridge if stored properly. Wrap each potato tightly in foil after baking to trap the steam and keep them moist. For make-ahead prep, bake them a day ahead, cool completely, then reheat in a 350°F oven for 15-20 minutes until warmed through. The sour cream topping? Make it fresh right before serving so it stays thick and creamy. If you're prepping for a crowd, I like to bake extra potatoes and reheat them in the oven—they actually taste better the second time around.
Why You'll Love This Recipe
- Two-Ingredient Magic: I swear by this combo—just potatoes, butter, and sour cream. That buttery crack under the skin? Pure reward for zero effort.
- Creamy Crisp Perfection: The outside gets golden and flaky while the inside stays pillowy. Slather that sour cream on top, and it’s like a hug in mashed-potato form.
- Leftover Hero: Make a batch on Sunday, and you’ve got lunch covered all week. Reheat slices in the oven—still tastes fresh, no one will guess it’s from yesterday.
- Budget-Friendly Feast: Russets are cheap, butter stretches far, and sour cream adds luxury without breaking the bank. Feed four for the price of takeout, and they’ll never know.
Step-by-step instructions for baked potato and sour cream recipe
Here's how to achieve that perfect combination of crispy skin and ultra-creamy filling every time.
Prep and Season the Potatoes for Maximum Crispiness
Preheat your oven to 425°F for that perfect crispy skin. Scrub the 4 whole Russet Potatoes thoroughly under cold water to remove any dirt—this helps the skin crisp up better. Using a fork, poke holes all over the potatoes (about 8-10 holes each) to allow steam to escape during baking. This prevents soggy insides.
Rub each potato generously with 2 tablespoons Olive Oil—this is your secret weapon for that golden-brown crust. Then sprinkle 1 teaspoon Salt and ¼ teaspoon Black Pepper evenly over each potato. The oil creates a barrier that helps the skin crisp while the salt enhances flavor. Don't skip this step—it makes all the difference!
Bake Until Fork-Tender with Perfect Crispy Skin
Place the potatoes directly on the oven rack (no baking sheet needed) for even heat circulation on all sides. Bake for 60-75 minutes until the skin is deep golden brown and a fork slides in easily with just slight resistance. You'll know they're done when you can pierce the skin without it feeling rubbery.
I like to check them at the 60-minute mark—if they're not quite there, return them to the oven for another 10-15 minutes. The key is patience here. Underbaked potatoes will be mealy inside, while overbaked ones burn. You want that perfect balance of crispy skin and fluffy interior.
Create the Ultimate Creamy Load
While the potatoes bake, melt the ½ cup Unsalted Butter in a small saucepan over low heat. Once melted, remove from heat and stir in the 1 cup Sour Cream until smooth. Add the remaining ½ teaspoon Salt, ¼ teaspoon Black Pepper, and ½ teaspoon Garlic Powder, mixing well. This creates the perfect creamy base for your potato tops.
For extra flavor, fold in the ½ cup Shredded Cheddar Cheese and ¼ cup Crispy Bacon Bits—these add that rich, savory depth. If you're using the optional ¼ cup Fresh Chives, set them aside for garnishing later. The cheese should melt slightly into the mixture, creating a luscious, gooey texture that's irresistible.
Assemble and Serve with Perfect Texture
Carefully slice open each baked potato and create a well in the center to hold the filling. Spoon the creamy butter mixture into each potato, pressing down gently to help it melt into the fluffy interior. The residual heat from the potatoes will make the filling even creamier—this is where the magic happens!
Garnish each serving with the chopped Fresh Chives and any extra Crispy Bacon Bits if desired. Serve immediately while the potatoes are still warm and the filling is at its peak creaminess. The contrast of crispy skin and ultra-creamy filling is what makes this recipe truly special—don't skip the chives for that fresh, bright finish!
Pro Tips For Making Baked Potato And Sour Cream
- PIERCE THE POTATOES FIRST: Russets are stubborn—skip the poking, and you’ll end up with a hollow, uneven bake. Use a sharp knife to make 4-5 deep cuts (not just shallow pokes) before baking. This lets steam escape properly, giving you a fluffy interior instead of a dense, undercooked mess.
- USE FULL-FAT SOUR CREAM: I learned this the hard way—light or low-fat sour cream turns into a sad, watery paste when mixed with hot potato. Full-fat (20% or higher) stays thick, creamy, and actually tastes like sour cream, not a science experiment. No excuses—it’s worth the extra few cents.
- BAKE AT 425°F, NOT 375°F: Your oven’s "medium" setting is probably lying to you. Russets need high heat (425°F) to develop that crispy skin and fluffy center. If you’re worried about burning, wrap them in foil after 30 minutes—but don’t lower the temp, or you’ll end up with a soggy potato.
- SALT THE BUTTER BEFORE MELTING: This isn’t just about seasoning—salting the butter (about ½ tsp per ¼ cup) before it melts ensures even distribution. If you wait until the potato’s done, you’ll end up with clumps of unsalted butter hiding in the crevices, and that’s just cruel. Trust me, your taste buds will notice.
Make-ahead tips for baked potato and sour cream
Bake Ahead Strategy
Bake your potatoes one day ahead for maximum convenience—this is my go-to trick for busy weeknights. After baking, let them cool completely, then wrap each one individually in heavy-duty aluminum foil.
Store in an airtight container at room temperature for up to 24 hours or refrigerate for 3-4 days. The foil traps moisture, keeping them fluffy inside while maintaining crispy skins. Reheat at 350°F for 15-20 minutes until warmed through. 🥔
Topping Prep Tips
Make your sour cream topping ahead of time but hold off on adding cheese or bacon until serving. Store the base mixture (butter, sour cream, salt, pepper, and garlic powder) in a small airtight container in the fridge for up to 2 days.
When ready to serve, simply reheat the potatoes and warm the topping mixture gently in the microwave (30 seconds) or on the stovetop. Stir in the cheese and bacon just before serving so they stay crispy and gooey. ✨
Game Day Hack
For large gatherings, bake extra potatoes and reheat them in batches in a 375°F oven for 10-15 minutes. Keep them wrapped in foil until ready to serve. Assemble toppings in small bowls so guests can customize their own—offer cheddar, bacon bits, chives, and even green onions for variety.
This keeps everything warm and lets everyone personalize their load. The crowd will love the interactive element! 🏈
Freezer-Friendly Option
If you're prepping for a future meal, you can freeze baked potatoes (without toppings) for up to 2 months. Bake them as directed, cool completely, then wrap tightly in plastic wrap followed by foil. Thaw overnight in the fridge, then reheat at 350°F for 20-25 minutes.
The texture holds up surprisingly well—just don't expect the same level of crispiness as freshly baked. Perfect for lazy Sundays when you want that cozy potato experience without the prep! ❄️
Reheating Perfection
For the best results when reheating, place potatoes directly on the oven rack (no tray needed) to crisp up the skins. If using the microwave, cover with a damp paper towel and heat in 1-minute intervals until warmed through.
The key is gentle heat—never microwave on high or the skins will turn rubbery. A quick broil for 2-3 minutes at the end adds extra crispiness if you're reheating from the fridge. 🔥
Nutrition facts
Frequently asked questions
Why do my baked potatoes turn out soggy instead of crispy?
The most common causes are not pricking the potatoes before baking or baking at too low a temperature. Always poke 8-10 holes with a fork and use 425°F for the first 20 minutes—this creates that perfect crispy skin. Also, avoid overcrowding in the oven and place them directly on the rack for even heat circulation.
Can I use sweet potatoes instead of Russets?
Yes, but you'll need to adjust the cooking time and method. Sweet potatoes have more moisture, so bake them at 375°F for 50-60 minutes until tender. For crispy skin, brush with olive oil and add a pinch of cinnamon or brown sugar to the sour cream topping. The texture will be slightly denser but still delicious!
How do I make this recipe dairy-free?
Replace the butter with 2 tablespoons olive oil or vegan butter and use full-fat coconut milk or dairy-free sour cream (like Kite Hill) for the topping. Add a splash of lemon juice to brighten the flavors. The texture will be slightly lighter but still creamy and satisfying.
What's the best way to reheat leftover potatoes?
For crispy skins, place potatoes directly on the oven rack and reheat at 350°F for 15-20 minutes. If using the microwave, cover with a damp paper towel and heat in 1-minute intervals—never on high. For extra crispiness, broil for 2-3 minutes at the end. The key is gentle heat to avoid rubbery skins.
Can I make this recipe in an air fryer?
Cut potatoes in half lengthwise, rub with olive oil and salt, then air fry at 400°F for 20-25 minutes, flipping halfway. For extra crispiness, spray with oil again after 15 minutes. The air fryer gives you faster cooking with that perfect golden crust—just watch closely to avoid burning.